The Quotation Tool gives several options to move items between an external application and the elements section. This article does not outline the exact definition of the file formats, if you need this, please refer to the user guide. There are a lot of other ways to move around data within the Quotation Tool, but this articles main focus is to describe how to interact with external applications.
Importing items from the Design Tool
Using Send to Quotation Tool
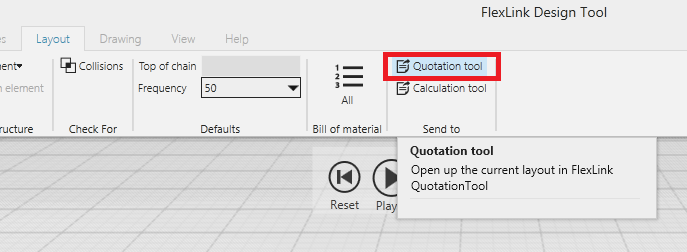
The easiest way to get the bill of material from the Design Tool into the Quotation Tool is to press the Quotation tool button in the Layout/Send to menu group. This requires that the Quotation Tool has been started and a price list has been selected in the quotation.

Once the button has been pressed a window will appear in the Quotation Tool:

There are two ways of importing the BOM:
- As single element will import all items into a single sub element. This will always puts the structure at the bottom of the element tree.
- Keep structure will keep any structure that has been created in the Design Tool and place supports, guide rail brackets, etc. into separate sub elements.
Using a file
There's also an option to manually exporting the bill of material data (to a file) and then import the file into the Quotation Tool. In the Design Tool click on File/Export/Create Bill of material file. To export the file into the Quotation Tool, the FlexLink format should be selected in order to keep all elements in a tree structure. Choosing this format, will generate an XML file that can be read by the Quotation Tool.
Now there's two ways that you can import this file into the Quotation Tool:
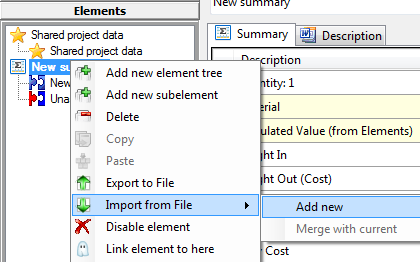
- To be able to use the Keep structure function you need to right click on a top node element and select Import/Add new. Then browse to your XML file and select it.

- The same dialog that was shown when you clicked the Quotation Tool button (in the Design Tool) will appear so that you can select to either import as a single sub element or to keep the structure.
- There's also the option to import all the items found in the BOM file directly into a sub element. Just click on the Import button found in the FlexLink material tab (then select if you want to replace or add the items in the BOM).

Tip!
The XML file created by the Design Tool can also be used to import the bill of material into the Online Store and the Chain Calculation Tool.
Getting items from the Online Store
There are two different ways that you can import a bill of material from the Online Store.
- Automatically downloading a saved shopping cart.
- Manual export and import using an XML file.
Automatic download
- Save the cart in the Online Store.
- Make sure that the same customer number is found in the Customer number field (in the customer tab) that you had when you saved the cart in the Online Store. You can obviously enter a customer number temporary just to be able to import a cart, there's nothing stopping you from changing or removing the customer number once the cart has been imported.
- Press the Import button in the Elements/FlexLink Material tab and select Import from Online Store cart (see picture above).
- A dialog will appear asking you for the name of the shopping cart, enter it and press the Ok button.

All products in the cart will be downloaded and configured items will even have a cost/price set. The CFID is also set on each configured item so if you want to export the material from the Quotation Tool to be imported again into the Online Store, the configurations will be automatically identified by the Online Store so that you do not have to re-configure them again,
Manual export
Use the export function in the Online Store to create an XML file (not Excel as shown below)

Save the file on disk. Now you can use the import function in the Flexlink material tab to import the contents of the cart.
Importing from FlexCAD
FlexCAD does not support structural import so your only option is to use the import function inside the Flexlink material tab.
To create a part list in FlexCAD, please read the following article.
Once the part list has been created you can use the Import function found in the FlexLink material tab in a sub element.
Importing and exporting non Flexlink material
The non FlexLink material (Mechanical, Pneumatical, Installation and Controls tabs) also have their dedicated import and export functions. This function is especially useful if you need to move the whole content of a tab into another tab. For instance, you can use it if you've put items into the wrong tab.
Just click on Export current in the tab where you want to export the material. Then in the tab to which you want to import press the Import button (then selecting if you want to replace the existing items or add the imported items).
There's also an export function for non Flexlink material found in the File menu. This function will export all non FlexLink material found in the quote. Please note that even though you could use this file to import all the data into a single element, it's not in any way recommended as the hours might not be imported correctly. This file is primarily intended to be used when you want to import the part list into an external system.
Of course the file generated from the element tab can also be used with an external system. Both files have the same structure and you'll find the specification in the user guide (elements chapter).
Importing from other tools
If you have an external system that generates your bill of material you can easily import that file using the import function in the element tabs as long as the file format follows the specifications. Please refer to the elements section of the user guide for more information.


