The 2017 quotation Word templates are distributed with version 2.1.23 of the Quotation Tool. Make sure that you are running version 2.1.20 or later before continuing reading this article. The version number can be found in the Help/About dialog.
In order to be able to use the new word template your administrator has to set up your local database. If you are not an administrator, talk to someone within your organization that is an have him/her follow the instructions below.
Administrator instructions
The Word template consist of four files, 3 Word templates to be used for different types of quotes and one containing all necessary text elements.
The three Word dotx files (named 2016 to replace existing templates)
BudgetQuoteTemplate2016.dotx
FixedQuoteTemplate2016.dotx
ComponentQuoteTemplate2016.dotx

One text element file
BudgetQuoteTemplate2015_TextElements.tex
All located in the folder
c:\Program Files (x86)\FlexLink Quotation Tool\Documents
Import the .tex file
The .tex file contains the text elements associated with the new Word files. You need to import them to be able to use the Word templates.
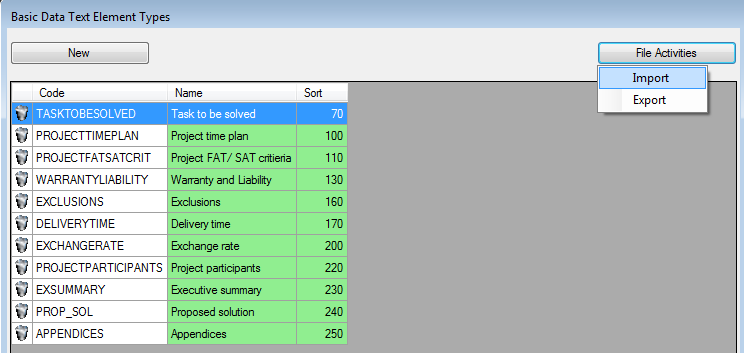
Open the Quotation Tool and go to Basic Data / Program Parameters / Text element types.
In the dialog click on File actions / Import.

Select the .tex file.
Now you've imported the text elements that corresponds to the fields found in the Word template (.dotx).
All the text elements shown in the picture above should be present in your list view of text element types. You might have other text element types that belongs to other templates as well, but leave them for now.
Time to test the template.
1. Select a customer
2. Enter a sales responsible
3. Enter a quote number and name, make sure that your quote language is set to English.
4. Add some items into the elements
5. Enter a quoted price in the summary/totals section.
6. In the Quotation Document, right click on Root and select Add all
7. Verify that the new text element types are present (if there's more text element types present, don't worry)
Your Quote Document / Text element tree should look like this:

8. Print the quotation (CTRL+SHIFT+P)
9. Make sure you select the new Word template (path described above).
10. Press Generate and hopefully you've created a test quote using the new template.
Update your FLQT templates
If you are using .flqt templates when starting the application (either when starting flqt or when creating a new quote via File/New) you need to update your .flqt template files so that they contain the correct text element types.
These files needs to be distributed to your users separately.
Translate
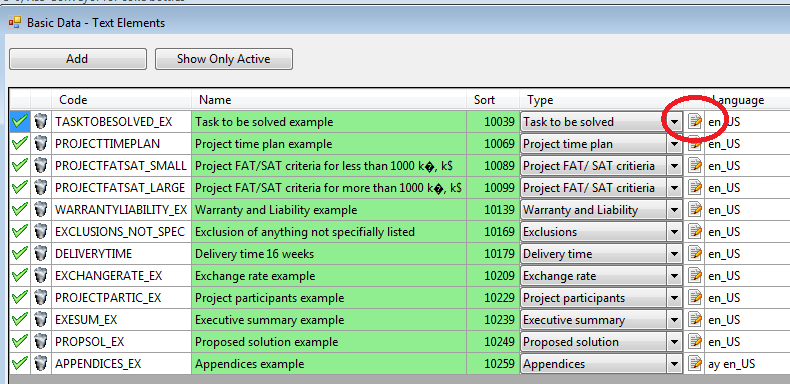
If you want to translate the text elements into another language you need to open up the Basic Data / Program Parameters / Text element alternatives dialog.
Click on the Edit button to edit the text element alternative

Then, when the dialog appears; copy the original text (English) using CTRL+A and CTRL+C.
Click on the Add language button.

Press select language and then paste the original English text into the edit window (CTRL+P).
Translate the text into the language you've selected and press Done to save.
Now repeat this procedure with all the text element alternatives that belongs to the new template (see previous image).
Open up the Word template ( c:\Program Files (x86)\FlexLink Quotation Tool\Documents\BudgetQuoteTemplate2015.dotx )
Translate all the fixed texts in the dotx and save it as a new dotx (select a different name).
It is NOT recommended to store custom templates in program files and neither is saving them on a network drive.
All template files should be stored locally on each users drive.
To test, select the language in the Quotation Information tab and print the quote (make sure that you select the correct/translated dotx.
Distribute the new templates
First thing you need to do is to make sure that all your users gets any new dotx and .flqt template files that you've created.
Then you need to make sure that they copy your database (sdf) either by using the DB Tool or via the auto update mechanism.